With
the recent surge of the 'do-it-yourself' type of enthusiast it
has become apparent, from the many phone calls received, that
some people find fault finding on a juke box confusing - it is
actually just a question Of methodically working through the different
systems present in a juke box. A jukebox has three basic systems
:
Making a selection,
Playing the selection,
and The Sound.
The
sound can always wait until you have the mechanics working correctly.
Best thing to do is disable the amplifier before you switch on
and then you will have oneless thing to worry about going up in
smoke.
It
is also worth considering having your amplifier rebuilt by an
expert, like myself, particularly valve types which are now of
an age that they could really do with a complete job and not just
a couple of caps and the odd resistor changed.
How
to disable your amplifier depends to some extent on the make/model.
The easiest way is to simply remove the H.T. rectifier valve.
You can, on some models, simply pull the supply lead to the amplifier,
but this can sometimes lead to a problem if the amp is also supplying
the low voltage to the mechanism ! Thought does have to be given
- get a service manual it should help, even if it is only when
you phone someone for a bit of F.F.A. (free friendly advice) !
So
with the amplifier not worrying you it is now time to look at
the mechanism. First you have to understand that the machine is
designed to take money. You are not allowed to operate the machine
without establishing A ÔcreditÕ and this is done by inserting
a coin.
The
coin is detected by the coin mechanism switches and sends an electrical
pulse to the credit unit which can also be called credit accumulator
or pricing unit depending on the manufacturer.
The
credit unit will not allow you to make a selection if it has no
credits established 'No pay - No play' So it is an important consideration
when trying to make your selection - you can put most machines
on to free play or manually clock up a credit or two - usually
done by locating the add coil (or CREDIT SWITCH)and manually operating
it.
This
done then you may try to select. If not satisfactory then check
that the mechanism can play the selection or as it is often referred
to - 'read-out'. To check this you must find a way of starting
the mechanism without the pushbuttons being involved.
If
this can be achieved then you must also find a way of faking a
selection. In Wurlitzer both operations happen simultaneously
: each selector pin represents the side of a record and if one
of them is made to 'pop-up' this also starts the mechanism motor
to turn to that pin.
Pre-Tormat
Seeburgs have a similar system but with a start switch separate
- Tormat type selectors have been dealt with in previous newsletters.
RockOla
generally have a start switch arrangement that has to be activated
before the machine will scan to look for the selector pin and
our dear old AMi also has its' scan control assembly in most models
for exactly the same reason.
By
establishing that the machine will 'read' the selection and hopefully
carry on to the play position you will have demonstrated that
at least half the machine works.
You
can then concentrate on making the selections? or 'writing' them
in via the button bank. I hope that you can appreciate how confusing
it could be if you do not establish what is or is not working
as most of the time we are looking at the symptoms of the fault(s)
rather than at the fault itself.
By
establishing that the machine will 'read' the selection and hopefully
carry on to the play position you will have demonstrated that
at least half the machine works. You can then concentrate on making
the selections Ð or Ôwriting' them in via the button bank.
I
hope that you can appreciate how confusing it could be if you
do not establish what is or is not working as most of the time
we are looking at the symptoms of the fault(s) rather than at
the fault itself.
All
juke boxes operate in this way although the actual hardware is
different between manufacturers. Before you give up and phone
for advice : Get your self a service manual !(available from The
JukeboxMan).
Try
to find which parts are working by some very basic work. If you
can't get your head round it get someone in who can - you know
it makes sense.
Fault
Finding - Seeburg
Seeburg did things a little differently to others and so the first
thing
that you will need is a service manual for your model (available
from The JukeBox Man) and then some spare time, alot of patience
and ignore the phone !
One
fault that often occurs in a Seeburg is that the carriage scans
twice and stops without playing the record that you selected.
As always you must check that all plugs are seated correctly and
all valves (if there are any) are lit up (the 5u4g only lights
when the mechanism is scanning). Check that there's a purple glow
in both type OA2 valves: no glow can be caused by a weak 6X4 valve.
If no trouble is found and the service switch is in the play position,
make sure that the machine has several credits logged in and proceed
as follows :
On the back door of your (50's) machine are two chassis
(not KD) . The Left hand is the Tormat Selector Unit (T.S.U.)
and the right hand the amplifier. For exact locations and positions
of valves etc.you should refer to the service manual for your
particular model of machine. On some models about halfway
down the T.S.U. is a long thin cover which,when removed, reveals
the "test terminals" lettered A-H - usually situated
near the "pulse amplifier".
Remove the terminal cover as you will need to use these
terminals to help you establish the location of the fault.
Remove the memory unit output plug from the pulse amp.
then connect one end of a 'jumper' wire to test terminal C leaving
the other end free. Make any selection and ,while the mechanism
is scanning, momentarily connect the free end of the lead
to the input of the pulse amp, making sure that you connect with
the centre of the socket.
The mechanism should immediately trip to play. If the
mechanism does not trip to play this could mean that you either
have : 1. A trip fault or 2. A pulse amp fault.
The obvious way to test for this is to replace the 2050
trip valve and/or the pulse amp 12AX7.They are the two most consistent
offenders although any of their associated circuitry could be
at fault.
One neglected capacitor by the would be restorer is the
0.05mfd inside the pulse amp. - worth changing!
However if the mechanism did trip, reject the record and
let the mechanism scan to a standstill. Remove the jumper wire
from C and carry out the following :
Momentarily connect the tip of the memory unit output
plug to the positive of a good 1.5 volt battery with the case
of the battery held against the corner of the pulse amp (i.e.
negative to earth). This simulates making all selections on the
tormat.
Replace the memory unit plug into the pulse amp input
and make any record selection. When the selection is made,regardless
of number/letter, the mechanism should immediately trip and play.
If so , reject the record and check if the next record plays -
the battery has effectively made every selection and all records
could be played if desired. If the mechanism trips on at least
two records pull out the memory unit input plug, reject that record
and allow the mechanism to scan and stop before replacing the
plug again. You now know that the 2050 trip is working , the pulse
amp and both OA2 valves with the 6X4 are also OK.
Consulting the manual for your machine will tell you the
position of the "Universal Pricing Unit" this is what
Seeburg call their credit unit. Remove its' cover to check that
the relays and trigger switches in it are clean and their contacts
are functioning correctly. It is also worth checking the relays
and contacts in the Stepper unit if there is one. The relays known
as timing relays are worth a check as just one contact not making
on these can also cause a 'write in' fault.
Blinkin'
Dinkin'
There
comes a time in every jukebox owners life when you are faced with
the necessity to dink.Quite simply dinking is the process of enlarging
the hole in the middle of the record so that it can be played
in a jukebox. Why is this necessary ? In the U.S.A they have a
slightly different system to us when it comes to playing vinyl.Originally
when the first 45rpm records were produced they had a large hole
made in the centre to designate the speed as 45.The 12 inch albums
had a small hole for 33.The early record decks that plugged into
your radio were made to promote the large hole and were made to
take a stack of the 7inch discs and auto-changed them. Of course
the 45rpm jukeboxes were all made to accommodate this system being
as they were,made in America.
However
and for whatever reasons, we here in the UK had a system with
all solid centres so that we could play any speed on our Dansettes!
Records did have pop-out centres making dinking redundant but
with reissues and anything past the sixties and you will probably
have solid centres.So how do you do it ? I am sure that there
are many ways but here are just one or two I have heard about.
Well, you could draw a circle with your kid's school compass,
then get out your Black and Decker fret saw, I'm sure we've all
seen a few records done in that or similar ways. The problem is
that the hole must be dead centre unless you are so tuneless that
wow and flutter (variations in speed caused by the non central
spinning disc) don't matter. A professional dinking tool is something
to search for. Back in the 'old' days such machines were very
common as most record stores had one ,tucked away under the counter,
and of course in latter years didn't realise what they had and
binned it ! They are easy and fast to operate so keep looking
- its worth it.
A
device appeared not so long ago which can only be described as
a scriber and was probably inspired by the kids compass routine.
However this has been refined so that the machined end of the
tool fits into the centre of the record and the arm sticking out
,which is sharpened,is then pressed into the plastic and turned
eventually cutting through the record.Pete assures me the process
is speeded up if you attack the record from both sides and that
it is important to keep the tool at right angles to the record,
particularly at the beginning of the process.If the cut is off-centre
to start with it's impossible to get back onto an accurate path
leaving yet another spoilt record.The other drawback is physical
: do a dozen of these in one evening and you'll feel decidedly
limp-wristed the next day !
Next
we have the Q-max cutter which is a precision made tool for cutting
holes in metal etc so a little bit of plastic does not bother
it. Consisting of two parts connected by a threaded bolt.The action
is simple -
put the bolt through the centre of the record with one half of
the cutter
on one side of the disc and screw on the other half from the other
side...but wait a minute ... that sounds easy - Well yes in theory
it is..
However,
the centre bolt is too wide to pass through the record hole which
means that you have to start by reaming the hol so its just big
enough. You can use a reamer or careful use of a countersink bit
in your drill or (do as our Nursie does) sharpen up the end of
the Allen key that you operate the cutter with ; using that as
the reamer as it is the correct size. It is essential that the
centre hole is not made oversize otherwise you will still not
be able to dink centrally. Here at The Jukebox Man I now supply
the Q-max with appropriate Alan key sharpened to a point - See here.
Next
step after enlarging the centre hole (very slightly ) is to keep
one half on the bolt on one side of the record and pass the bolt
through the plastic.Then you thread the cutter on to the bolt
that sticks through the centre.Using the other end of the Alan
key you can now tighten the two halves together.It is important
to keep going even though you may hear some alarming clicks etc..
The record should now have a large hole centre ready to be played
on your juke box. What goes wrong ?
Well
I suppose getting the hole too big is number one and number two
is certainly that when dinking records without a paper label they
tend to break - even with the professional tool. Now this has
always annoyed and baffled me but, thanks to a customer, I have
a pretty good solution. I used to tell people to warm the cutter
up if you were going to do those type of records were the printing
is direct on to the plastic and then maybe there would not be
so many breakages however just recently a customer came to me
and said that he had quite a high success rate when dinking these
type of records if he stuck masking tape across the centre first
(on both sides) and then dinked them ... O yeah ! ....WELL ....
I have tried it and all I can say is - WOW !
FREE
Play!
'Free
play' what a phrase, it just has that certain ring about it -
I love it. What is for free in this life ? Well I reckon playing
your own juke in your own home should be. I know a lot will disagree,
especially if you have just bought or are thinking of buying a
jukebox. Old hands at the game will already be nodding sagely
as they know what is coming next. Yes it is nice to 'drop-the-coin-right-into-the-slot'
but after the coin has 'hung-up' on you a few times that really
gets a little tedious, especially if you are having a party: having
to pull the juke out of the corner - take the backs off and remove
the slug rejector to enable you to clear the jammed coin with
the assistance of several drunken bums chief of whom being yourself
!
'Free Play' is the answer ! So what is 'Free Play' ?
Free Play - is a way of 'fixing' the credit unit so that
it is fooled into thinking that coins have been deposited.
On the early models of machines such as Wurlitzer 1015
and 1100 it is usual to put a jumper plug in place of the coin
grinder unit plug as these were relatively simple circuits which
can be easily rigged with no trouble at all - eg for a Wurlitzer
model 1015: link pins 1 to 8 and then pins 5 to 6 on a dummy plug
for the model 1100 simply link pins 1 to 3. Later makes/models
present different problems.
Ami in the 1950's and some 60's models that used similar credit
units are, like most jukes, easy to render to free play. Assuming
that your credit unit is functioning - establish credit. Then
locate the subtract coil - that's easy as it will be the
coil that actuates when you make a selection as it removes a credit.
Next remove the supply to that coil : this can be done by cutting
one of its wires and taping up the bare ends or you could add
a simple on/off switch. By including a switch in the circuit you
can then , at the flick of the switch, convert from free play
back to the credits being taken off and back to dropping the coins.
RockOla jukes are not so easy !
The action of the subtract coil is integral to the selection pulse
being switched through to the pin banks. This is done when the
subtract coil actuates, the arm that moves down to remove a credit
off the credit wheel also closes a set of leaf switches which
send the pulse on its way. One way to put this type of credit
unit on free play is to carefully remove the end piece of that
arm which is also spring loaded. The arm will then still actuate
but not remove any credits.
Of course it is essential that you keep those small pieces
in a bag inside your juke as they would be difficult to rplace
if lost. You could also get around the same problem by jamming
the credit wheel assembly actuator : this would be the same effect
as if the coin switch was actuated but without the smoke and fuses
blowing.
Wurlitzers using their'playrack'system are simple. The
spring that pulls the black credit wheel back to the key switch
when the subtract coil fires is easily fitted the opposite way
and will keep the wheel from opening the switch and so on free
play Lastly Seeburgs : it is not recommended that you mess around
with the pricing units trying to put them on free play as this
usually leads to excessive heat in the latch coil quite often
leading to a small fire. There are devices claiming to be
free play units but actually all they do is save the latch solenoid
from burning out. This can be done just by disconnecting it and
all his means is that you will have to hold the letter and the
number button down together at the same timewhen selecting.
Rubbers!
Just
as important as loudspeaker phasing and just as overlooked are
the parts made out of rubber in your jukebox.Parts made from rubber
usually have a key role in the function of the juke.
It is essential that these parts are in good condition and are
not allowed to become hard,brittle,perished or misshapen in any
way as this can seriously effect your jukes performance. Age and
bad storage contribute to the rubber parts"going off"
.In certain positions it is often the constant contamination of
lubricants that also contribute to the rubbers failure.
SEEBURG
Rumble in the"selectomatic"mechanism can often be pinpointed
to the rubber mount discs top and bottom of the motor and/or the
motor coupling between the motor shaft and the Mechanism mechanism
drive worm.These need to be checked to make sure that they are
still resilient or motor noise will be easily transmitted to the
pick-up if they have hardened.
WURLITZER
Phono motor drive belts are obvious things to check but what about
the two rubber mounts holding the motor to the mechanism AND the
two grommets cushioning the motor bracket from the mechanism...Usually
"rock hard" by now and giving absolutely no isolation,for
the pick-up,from the motor vibration. Result quite a racket reproduced
through the speakers and very noticeable on quiet records and
lead in- and lead out grooves.
ROCKOLA and AMI
Phono motor mounts MUST be pliable to maintain their anti-vibration
qualities and the correct height for the motor spindle so the
idler wheel is positioned correctly.The idler wheel should not
be"rock hard" as it too must absorb motor noise ,not
transmit it !
The wheel can also be the source of,an often heard rhythmic knocking/bumping
noise that emanates from the speakers,in the background of the
record that you are playing. This noise is due to an indentation
on the edge of the wheel in the rubber:usually caused by long
term storage with the turntable in place - the motor spindle digging
in to the rubber surface. As the turntable revolves the bump occurs
every -time the blemish goes over the motor spindle. On earlier
RockOlas the tone arm pivots at the rear supported by two rubber
grommets. This pair of grommets often deteriorate to the point
of disintegration causing inconsistent record set-down any where
on the record.
The only real cure when rubber parts are affected is to replace
them.
Leaf
Switches
Having
had to explain to customers on more than half a dozen occasions
how to adjust 'leaf switches' I thought that I would share it
with all of you and maybe not get asked quite so many times in
the future.
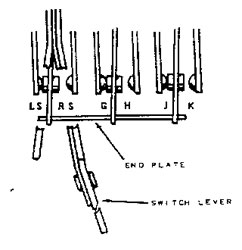
Leaf switches are in most of the older models of juke box. They
are designed to be accessible for cleaning and maintenance. Basically
consisting of thin strips of sprung copper with a contact fixed
to one end and held at the other in strips of insulated material.
The switches can be built up in to many different configurations
to provide multiple switching actions such as the Seeburg reversing
switch shown below -
Many
of this type are actuated by a lever/spring arrangement with the
different sections of switches movement coordinated by the end
plate.This will ensure all switch sections change simultaneously.
This type of switch was used by not only Seeburg but Wurlitzer,
AMi and RockOla and it is not unknown for the switches of this
type to loose their spring device that snaps the end plate over
thus loosing the switching action and even that end plate to be
missing.
Cleaning contacts is another of the restorers "mysteries"
- or rather - how to do it properly is. "Flooding" the
contacts with switch cleaner isn't really going to help on old
tarnished contacts. Switch cleaner will loosen the dirt and if
you use too much will also swill some of it out ! However
this is NOT the most effective way that it can be done . Certainly
use switch cleaner to loosen the dirt, preferably a type of switch
cleaner that evaporates and does NOT leave a deposit. Then using
a rough piece of thickish paper pass it between the contacts that
are closed - simple as that. Heavier deposits can be removed with
the aid of the contact cleaning "pen" that I sell with
the stiff fibre glass tips -very effective. You can buy contact
burnishers, which if you get the correct grade, are also very
effective. DO NOT use course emery paper, sand paper, Files or
Wire Wool -- if you do then a nasty disaster could be waiting
just for the switch you use it on. When cleaning the contacts
you should aim not to scratch or rough them up as this uneven
surface can promote electrical arcing.
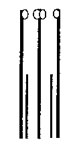
Adjustment of these types of switches is often bodged. Lets look
at a typical type:
You
can see from this simplified diagram that there is a central
moving leaf which has a leaf contact to the left and to the right.
The central leaf has two contacts so that it can make to the contacts
on the left or right leaf whichever way it is moved. With extended
use the leaves start to lose some of their tension, the contacts
wear down slightly and so the contact force becomes less and less
: result in switching failure. Cleaning the contacts will not
help this problem. Obviously the contacts need to meet with more
force to ensure a positive switch action. How is this often achieved
: people BEND IT and that is wrong ! So how do you do it
? Do NOT bend the leaves of the switch as you will then make the
contacts touch at an angle instead of square on. This can also
give a poor switching action and will lead to uneven wear of the
contact, thus creating the problem again, but this time the contact
will need to be changed.
It is simple all you have to do is move the short 'tension'
strips at the side of the contacts either towards or away
from them. That is their purpose and usually that is all that
is required to alter gaps/pressures.
Check it out when you next have to fiddle around with this type
of switch.
Jukebox
Lighting
I
have been answering the same old queries about jukebox lighting
quite a lot just recently. Things tend to go around in circles
I notice. Fluorescent tubes are the main type of cabinet lighting
found in jukeboxes apart from light bulbs in the early ones. Fluorescent
light was first exhibited at the Chicago Centennial Exposition
in 1933 and came into popular use in 1939 and by the 50's had
largely replaced light bulbs in most commercial establishments.
Fluorescent lamps (flo - tubes) emit more light per watt than
incandescent (normal) light bulbs. Their light is generally "whiter"
than ordinary electric lamps and if the chemicals in the interior
phosphor coating of the lamp is changed different light tones
can be produced.
The
heat produced is less than that of bulbs and the added bonus is
that the tubes give a greater, more even, spread of light over
their length than light bulbs thus giving us ideal decor lighting
for a cabinet,such as a jukebox.
How they work.
When the lamp is switched on a stream of electrons flow between
the two ends (the electrodes), bombard the glass tube,excite the
fluorescent powder, causing it to fluoresce, and produce the characteristic
light. Well that's fairly clear - I hope. Initially the flow of
electrons has to be started.This is done by preheating the electrodes
by means of the starter (there are other types of circuitry but
let me try to keep it simple and as applied to most jukes that
I've seen).
The
starter as we all know, is a small metal or plastic canister.
When the light is switched on,contacts in the starter close and
after a short interval during which time the electrodes are heated,
the contacts open causing a surge of high voltage from the choke
(or ballast) which is discharged between the two end electrodes
and initiates the electron flow. The choke then acts as a current
limiter: stabilising the current at a level needed by the lamp.
Unless controlled, the current within the lamp would continue
to increase until the lamp fails : as when you have a short circuit
choke....a very bright light for a very short length of time resulting
in a useless flo tube. Never use any choke (ballast) except the
one that is designed for the specific use it is put to. One of
the by-products of the choke limiting the current is heat .
The
heat produced by the choke (ballast) is enough when the component
is used on the correct mains system for which it was designed.....for
example: 240v 50hz chokes run warm on 50hz mains systems AND 110
volt 60hz chokes run warm on 60hz mains system HOWEVER if you
take the 60hz choke and run it at 110volts BUT on 50hz system
just like we do with our jukebox lights the result is that more
heat is produces than is normal or healthy for the chokes. A way
to prolong the life of your jukes wound components (not just the
chokes) is to use a stepdown voltage of 100 - 110 volts and certainly
no more than 115 which is plenty - over 115 and things can start
to get rather too warm.
When
replacing lighting components it is important to remember to order
the correct type of choke both by volts and wattage. Equally as
important is the starter's volts and wattage.Tubes are only rated
by wattage - diameter and the length , which is measured to include
the pins .
If you have a flo tube that is being particularly stubborn at
lighting simply try refitting the starter 180 degrees to what
it is : ie the two pins of the can need to swap places and this
may help it to start quicker. "Fat tubes"or "Thin
tubes" ? That is the question quite often asked. Well fat
ones T12(1.5inch diameter) give out a bit more light but are classed
as energy inefficient : "energy guzzlers". So the thinner
type T8 (1inch diameter) are more efficient at converting the
energy into light but often are a lower wattage output by a couple
of watts perhaps.
Unfortunately
the thin type of say 30" in a Wurlitzer 2300 series will
not light but the fat ones do, likewise some jukes that use thin
ones will not light fat ones , but I can't say for sure why! Many
thin tubes will work on 60 cycle mains bettter than on our 50
cycle mains and some are made for use in conjunction with the
quick start electronic system and really only work with that system.
In the not to distant future I have heard that the flo tube manufacturers
will stop making the T12 tubes. Indeed at times it is already
quite difficult to get certain tube sizes but ,hopefully, production
will not cease entirely although demand is bound to fall as other
lighting systems that produce higher savings become more and more popular like LED which are now very common.
One More Time, lamp changing instructions pdf download, click here.
Real
Wood Finishes
A
contribution from Norman Macrae (subscriber 182 to Jukebox
News)
Being
able to recreate a wood finish (wood graining or scumbling) is
quite useful in the restoration of some jukeboxes. Some years
ago, I came across someone who recreated these finishes and he
did some Seeburg M110Cs and an M100A for me - superb jobs. Unfortunately
this technique came very much back into fashion fairly recently
with the result that my contact got very busy, his prices increased
and I don't think he was really interested in my mundane cabinets
any longer.The finishes he did for me were based on colour photographs
etc of the machines and he always told me that they were really
straight forward to do because there were no fiddley bits (no
knots in the wood etc - which is more complicated for the novice
to recreate). Last year, I was restoring a Seeburg KD200. The
finish on the cabinet sides was really dreadful, it was painted
off-white - a sort of creamy yellow /brown, if you can imagine
that; durable but horrible and it had to go!.
During
a visit to my local B&Q, I spotted a special offer on a wood graining
kit,containing base coat, top coat, comb device to create the
grain and an instruction leaflet - exactly what was required!
So the time had come, the KD sides were to be tackled and I was
to make my first attempt at wood graining. I selected the wood
finish I considered most suitable and for about £10, I was in
business.
The
way that this finish is applied is to lay down a base coat and
let it dry; then lay down thetop coat and while it is still wet,
create the grain by drawing the comb through the top coat to expose
the base coat. Or put more simply - follow the instructions in
the kit. I spent some time practising on a piece of white hard
board to make sure that I could get the style of finish that I
wanted. In the end I used a stiff paintbrush to create the graining;
this gave a finer grain which was more similar to the original.
After the initial practice runs, I then did a bit of practice
on the machine itself. I actually ended up using the horrible
creamy yellow / brown as the base coat (I decided it looked best!),
I just sanded it down a bit first.
The
secret, I think, is to practice until you are confident that you
have got the method right and the grain pattern is exactly what
you want. Don't worry if at first you don't succeed , just wipe
off your efforts and try again. Because of the lack of fiddley
bits, it was just a case of drawing the brush from top to bottom
moving from left to right with adjacent stokes across the KD side
panel creating the grain progressively until the complete side
was done.
When
you've completed the job and you're happy with the result, let
the paint dry and then seal the finish with some clear varnish.
I was well pleased with my first effort, it really was straightforward
and the necessary paints etc are now readily available in all
do-it-youself shops. I believe that B&Q even do demonstrations,
not that I've attended any of course - after all I have just awarded
myself the qualification of wood grainer (lower grade).
Jukebox
spare parts for Wurlitzer Jukeboxes, Seeburg Jukeboxes, AMI Jukeboxes,
Rock-ola Jukeboxes, from Europes leading Jukebox
spare parts supplier. Jukebox parts and Jukebox spares, Jukebox
needles and styli for all makes of jukebox including Wurlitzer
Jukeboxes, Seeburg Jukeboxes, AMI Jukeboxes, Rock-ola Jukeboxes. Jukebox amp replacement valves, motors, castors
and loudspeakers. Jukebox Maintenance, service. Record dinkers. Jukebox title strips in a range
of colours. repairs to all makes of Jukebox (except NSM and Jupiter).
Jukebox keys and locks.

 Many
of this type are actuated by a lever/spring arrangement with the
different sections of switches movement coordinated by the end
plate.This will ensure all switch sections change simultaneously.
This type of switch was used by not only Seeburg but Wurlitzer,
AMi and RockOla and it is not unknown for the switches of this
type to loose their spring device that snaps the end plate over
thus loosing the switching action and even that end plate to be
missing.
Many
of this type are actuated by a lever/spring arrangement with the
different sections of switches movement coordinated by the end
plate.This will ensure all switch sections change simultaneously.
This type of switch was used by not only Seeburg but Wurlitzer,
AMi and RockOla and it is not unknown for the switches of this
type to loose their spring device that snaps the end plate over
thus loosing the switching action and even that end plate to be
missing.